01 Dubbo 源码环境搭建:千里之行,始于足下
好的开始是成功的一半,阅读源码也是一样。 很多同学在下定决心阅读一个开源框架之后,就一头扎进去,迷失在代码“迷宫”中。此时,有同学意识到,需要一边 Debug 一边看;然后又有一批同学在搭建源码环境的时候兜兜转转,走上了放弃之路;最后剩下为数不多的同学,搭建完了源码环境,却又不知道如何模拟请求让源码执行到自己想要 Debug 的地方。
以上这些痛点问题你是不是很熟悉?是不是也曾遇到过?没关系,本课时我就来手把手带领你搭建 Dubbo 源码环境。
- 在开始搭建源码环境之前,我们会先整体过一下 Dubbo 的架构,这可以帮助你了解 Dubbo 的基本功能以及核心角色。
- 之后我们再动手搭建 Dubbo 源码环境,构建一个 Demo 示例可运行的最简环境。
- 完成源码环境搭建之后,我们还会深入介绍 Dubbo 源码中各个核心模块的功能,这会为后续分析各个模块的实现做铺垫。
- 最后,我们再详细分析下 Dubbo 源码自带的三个 Demo 示例,简单回顾一下 Dubbo 的基本用法,这三个示例也将是我们后续 Debug 源码的入口。
Dubbo 架构简介
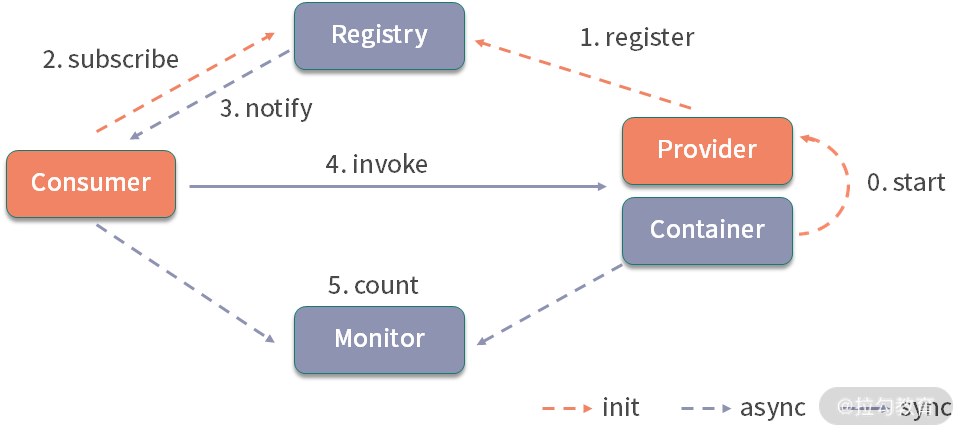
为便于你更好理解和学习,在开始搭建 Dubbo 源码环境之前,我们先来简单介绍一下 Dubbo 架构中的核心角色,帮助你简单回顾一下 Dubbo 的架构,也帮助不熟悉 Dubbo 的小伙伴快速了解 Dubbo。下图展示了 Dubbo 核心架构:
Dubbo 核心架构图
- Registry:注册中心。 负责服务地址的注册与查找,服务的 Provider 和 Consumer 只在启动时与注册中心交互。注册中心通过长连接感知 Provider 的存在,在 Provider 出现宕机的时候,注册中心会立即推送相关事件通知 Consumer。
- Provider:服务提供者。 在它启动的时候,会向 Registry 进行注册操作,将自己服务的地址和相关配置信息封装成 URL 添加到 ZooKeeper 中。
- Consumer:服务消费者。 在它启动的时候,会向 Registry 进行订阅操作。订阅操作会从 ZooKeeper 中获取 Provider 注册的 URL,并在 ZooKeeper 中添加相应的监听器。获取到 Provider URL 之后,Consumer 会根据负载均衡算法从多个 Provider 中选择一个 Provider 并与其建立连接,最后发起对 Provider 的 RPC 调用。 如果 Provider URL 发生变更,Consumer 将会通过之前订阅过程中在注册中心添加的监听器,获取到最新的 Provider URL 信息,进行相应的调整,比如断开与宕机 Provider 的连接,并与新的 Provider 建立连接。Consumer 与 Provider 建立的是长连接,且 Consumer 会缓存 Provider 信息,所以一旦连接建立,即使注册中心宕机,也不会影响已运行的 Provider 和 Consumer。
- Monitor:监控中心。 用于统计服务的调用次数和调用时间。Provider 和 Consumer 在运行过程中,会在内存中统计调用次数和调用时间,定时每分钟发送一次统计数据到监控中心。监控中心在上面的架构图中并不是必要角色,监控中心宕机不会影响 Provider、Consumer 以及 Registry 的功能,只会丢失监控数据而已。
搭建Dubbo源码环境
当然,要搭建Dubbo 源码环境,你首先需要下载源码。这里你可以直接从官方仓库 https://github.com/apache/dubboFork 到自己的仓库,直接执行下面的命令去下载代码:
git clone git@github.com:xxxxxxxx/dubbo.git
然后切换分支,因为目前最新的是 Dubbo 2.7.7 版本,所以这里我们就用这个新版本:
git checkout -b dubbo-2.7.7 dubbo-2.7.7
接下来,执行 mvn 命令进行编译:
mvn clean install -Dmaven.test.skip=true
最后,执行下面的命令转换成 IDEA 项目:
mvn idea:idea // 要是执行报错,就执行这个 mvn idea:workspace
然后,在 IDEA 中导入源码,因为这个导入过程中会下载所需的依赖包,所以会耗费点时间。
Dubbo源码核心模块
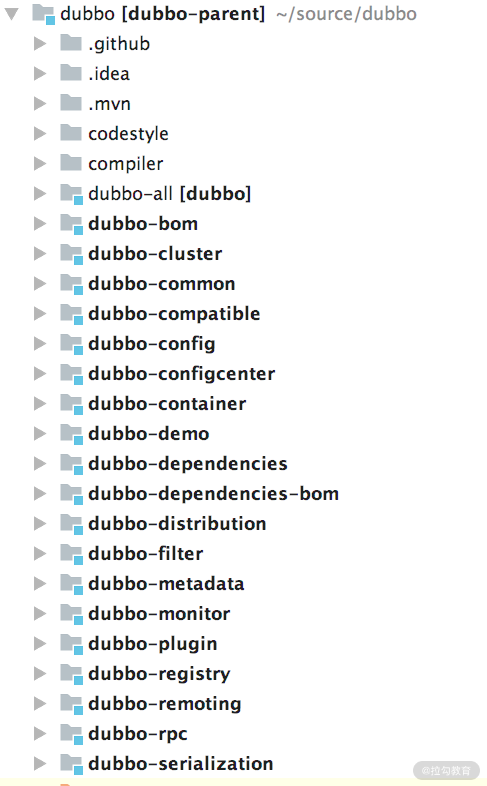
在 IDEA 成功导入 Dubbo 源码之后,你看到的项目结构如下图所示:
下面我们就来简单介绍一下这些核心模块的功能,至于详细分析,在后面的课时中我们还会继续讲解。
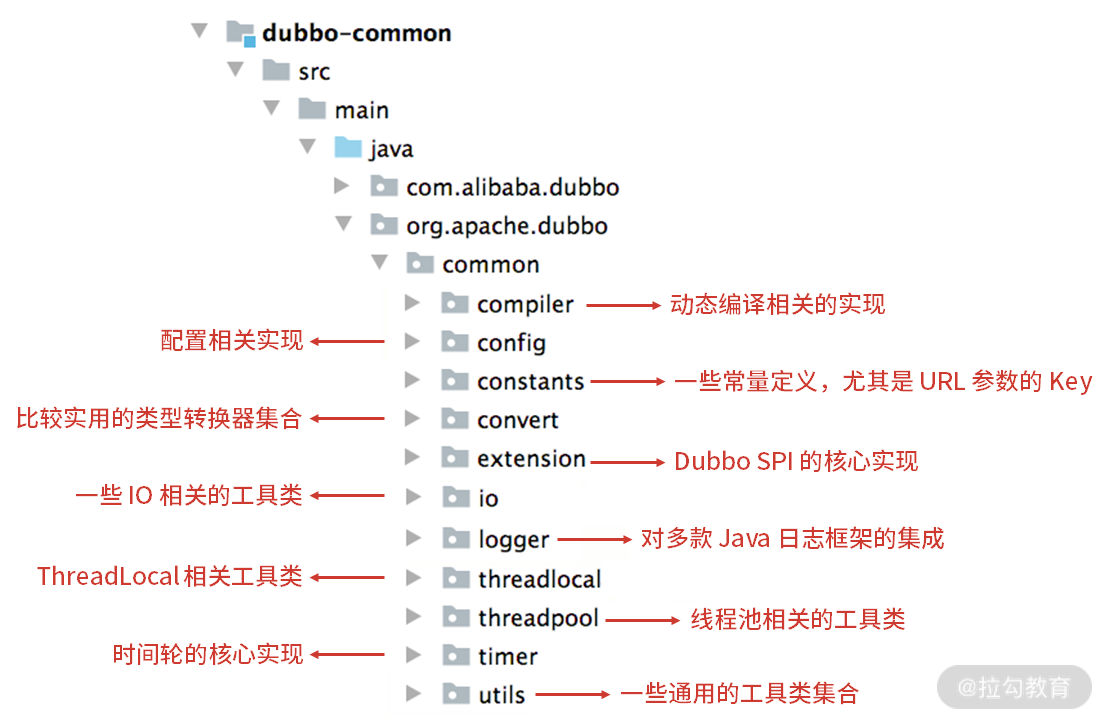
- dubbo-common 模块: Dubbo 的一个公共模块,其中有很多工具类以及公共逻辑,例如课程后面紧接着要介绍的 Dubbo SPI 实现、时间轮实现、动态编译器等。
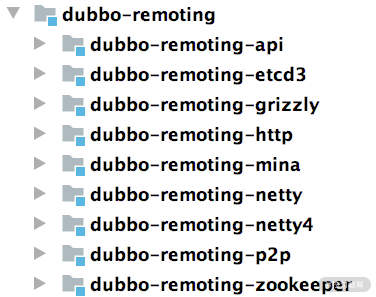
- dubbo-remoting 模块: Dubbo 的远程通信模块,其中的子模块依赖各种开源组件实现远程通信。在 dubbo-remoting-api 子模块中定义该模块的抽象概念,在其他子模块中依赖其他开源组件进行实现,例如,dubbo-remoting-netty4 子模块依赖 Netty 4 实现远程通信,dubbo-remoting-zookeeper 通过 Apache Curator 实现与 ZooKeeper 集群的交互。
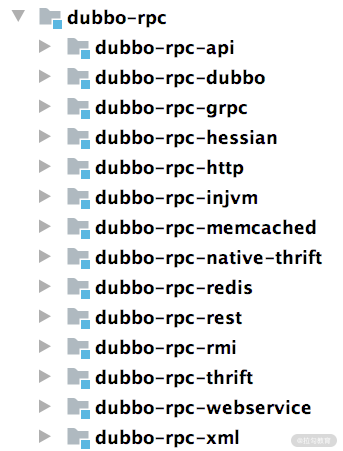
- dubbo-rpc 模块: Dubbo 中对远程调用协议进行抽象的模块,其中抽象了各种协议,依赖于 dubbo-remoting 模块的远程调用功能。dubbo-rpc-api 子模块是核心抽象,其他子模块是针对具体协议的实现,例如,dubbo-rpc-dubbo 子模块是对 Dubbo 协议的实现,依赖了 dubbo-remoting-netty4 等 dubbo-remoting 子模块。 dubbo-rpc 模块的实现中只包含一对一的调用,不关心集群的相关内容。
- dubbo-cluster 模块: Dubbo 中负责管理集群的模块,提供了负载均衡、容错、路由等一系列集群相关的功能,最终的目的是将多个 Provider 伪装为一个 Provider,这样 Consumer 就可以像调用一个 Provider 那样调用 Provider 集群了。
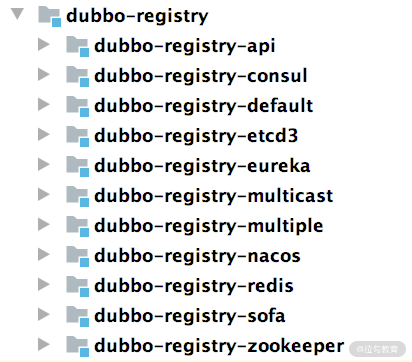
- dubbo-registry 模块: Dubbo 中负责与多种开源注册中心进行交互的模块,提供注册中心的能力。其中, dubbo-registry-api 子模块是顶层抽象,其他子模块是针对具体开源注册中心组件的具体实现,例如,dubbo-registry-zookeeper 子模块是 Dubbo 接入 ZooKeeper 的具体实现。
- dubbo-monitor 模块: Dubbo 的监控模块,主要用于统计服务调用次数、调用时间以及实现调用链跟踪的服务。
- dubbo-config 模块: Dubbo 对外暴露的配置都是由该模块进行解析的。例如,dubbo-config-api 子模块负责处理 API 方式使用时的相关配置,dubbo-config-spring 子模块负责处理与 Spring 集成使用时的相关配置方式。有了 dubbo-config 模块,用户只需要了解 Dubbo 配置的规则即可,无须了解 Dubbo 内部的细节。
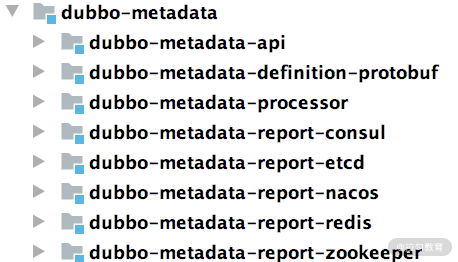
- dubbo-metadata 模块: Dubbo 的元数据模块(本课程后续会详细介绍元数据的内容)。dubbo-metadata 模块的实现套路也是有一个 api 子模块进行抽象,然后其他子模块进行具体实现。
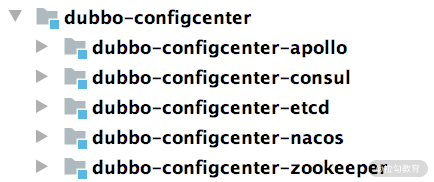
- dubbo-configcenter 模块: Dubbo 的动态配置模块,主要负责外部化配置以及服务治理规则的存储与通知,提供了多个子模块用来接入多种开源的服务发现组件。
Dubbo 源码中的 Demo 示例
在 Dubbo 源码中我们可以看到一个 dubbo-demo 模块,共包括三个非常基础 的 Dubbo 示例项目,分别是: 使用 XML 配置的 Demo 示例、使用注解配置的 Demo 示例 以及 直接使用 API 的 Demo 示例 。下面我们将从这三个示例的角度,简单介绍 Dubbo 的基本使用。同时,这三个项目也将作为后续 Debug Dubbo 源码的入口,我们会根据需要在其之上进行修改 。不过在这儿之前,你需要先启动 ZooKeeper 作为注册中心,然后编写一个业务接口作为 Provider 和 Consumer 的公约。
启动 ZooKeeper
在前面 Dubbo 的架构图中,你可以看到 Provider 的地址以及配置信息是通过注册中心传递给 Consumer 的。 Dubbo 支持的注册中心尽管有很多, 但在生产环境中, 基本都是用 ZooKeeper 作为注册中心 。因此,在调试 Dubbo 源码时,自然需要在本地启动 ZooKeeper。
那怎么去启动 ZooKeeper 呢?
首先,你得下载 zookeeper-3.4.14.tar.gz 包(下载地址: https://archive.apache.org/dist/zookeeper/zookeeper-3.4.14/)。下载完成之后执行如下命令解压缩:
tar -zxf zookeeper-3.4.14.tar.gz
解压完成之后,进入 zookeeper-3.4.14 目录,复制 conf/zoo_sample.cfg 文件并重命名为 conf/zoo.cfg,之后执行如下命令就可以启动 ZooKeeper了。
>./bin/zkServer.sh start

# 下面为输出内容

ZooKeeper JMX enabled by default

Using config: /Users/xxx/zookeeper-3.4.14/bin/../conf/zoo.cfg # 配置文件

Starting zookeeper ... STARTED # 启动成功
业务接口
在使用 Dubbo 之前,你还需要一个业务接口,这个业务接口可以认为是 Dubbo Provider 和 Dubbo Consumer 的公约,反映出很多信息:
- Provider ,如何提供服务、提供的服务名称是什么、需要接收什么参数、需要返回什么响应;
- Consumer ,如何使用服务、使用的服务名称是什么、需要传入什么参数、会得到什么响应。
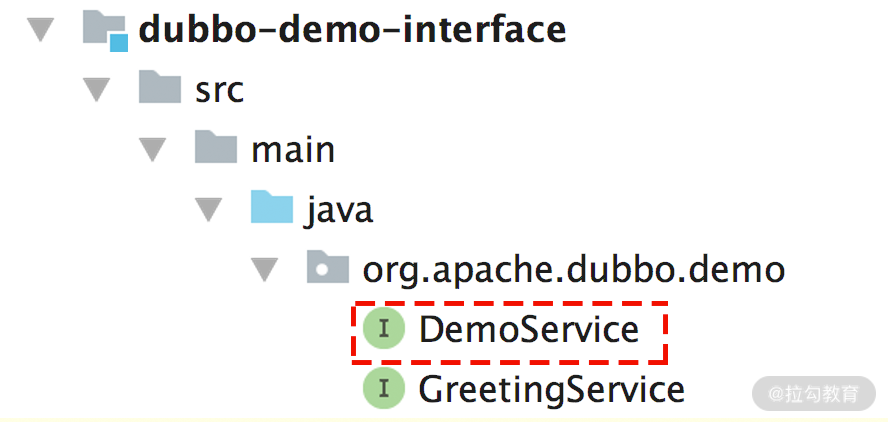
dubbo-demo-interface 模块就是定义业务接口的地方,如下图所示:
其中,DemoService 接口中定义了两个方法:
public interface DemoService {

    String sayHello(String name); // 同步调用

    // 异步调用

    default CompletableFuture<String> sayHelloAsync(String name) {

        return CompletableFuture.completedFuture(sayHello(name));

    }

}
Demo 1:基于 XML 配置
在 dubbo-demo 模块下的 dubbo-demo-xml 模块,提供了基于 Spring XML 的 Provider 和 Consumer。
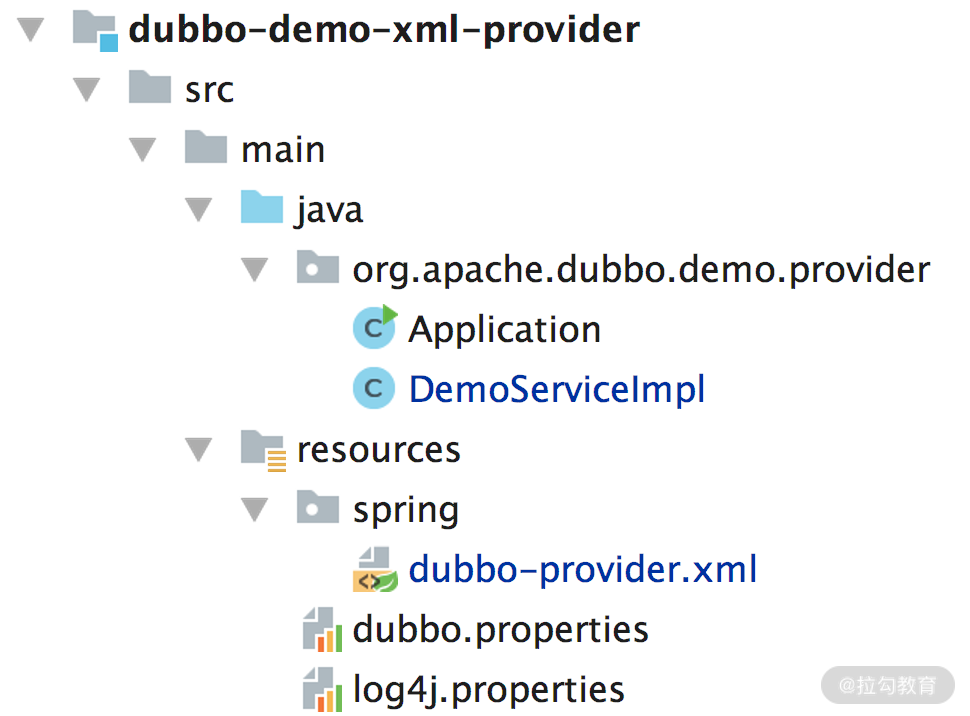
我们先来看 dubbo-demo-xml-provider 模块,其结构如下图所示:
在其 pom.xml 中除了一堆 dubbo 的依赖之外,还有依赖了 DemoService 这个公共接口:
<dependency>

    <groupId>org.apache.dubbo</groupId>

    <artifactId>dubbo-demo-interface</artifactId>

    <version>${project.parent.version}</version>

</dependency>
DemoServiceImpl 实现了 DemoService 接口,sayHello() 方法直接返回一个字符串,sayHelloAsync() 方法返回一个 CompletableFuture 对象。
在 dubbo-provider.xml 配置文件中,会将 DemoServiceImpl 配置成一个 Spring Bean,并作为 DemoService 服务暴露出去:
<!-- 配置为 Spring Bean -->

<bean id="demoService" class="org.apache.dubbo.demo.provider.DemoServiceImpl"/>

<!-- 作为 Dubbo 服务暴露出去 -->

<dubbo:service interface="org.apache.dubbo.demo.DemoService" ref="demoService"/>
还有就是指定注册中心地址(就是前面 ZooKeeper 的地址),这样 Dubbo 才能把暴露的 DemoService 服务注册到 ZooKeeper 中:
<!-- Zookeeper 地址 -->

<dubbo:registry address="zookeeper://127.0.0.1:2181"/>
最后,在 Application 中写个 main() 方法,指定 Spring 配置文件并启动 ClassPathXmlApplicationContext 即可。
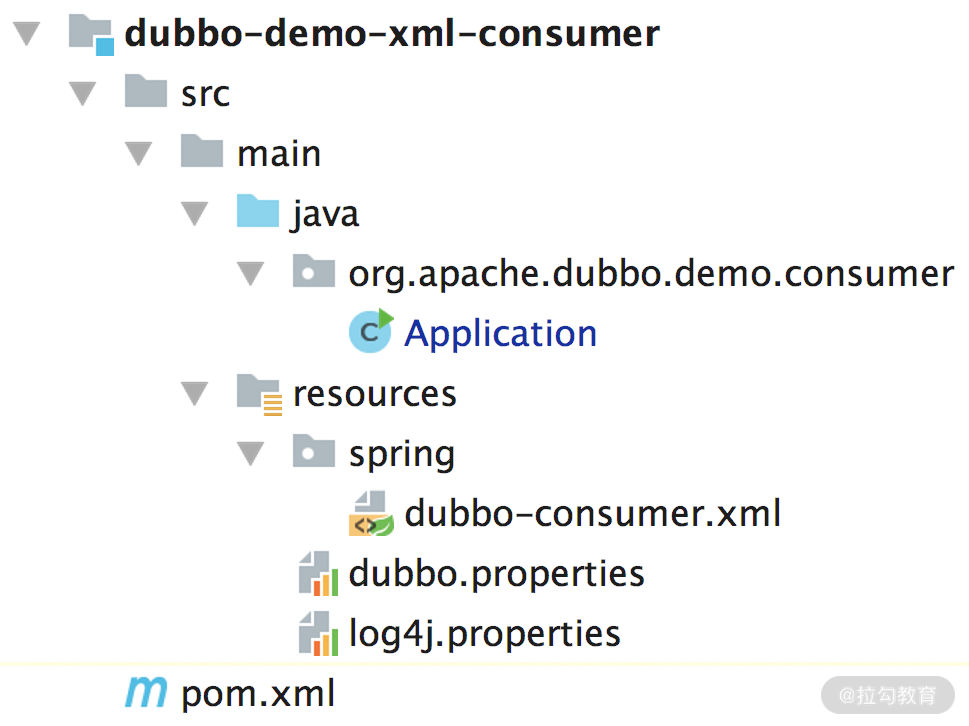
接下来再看 dubbo-demo-xml-consumer 模块,结构如下图所示:
在 pom.xml 中同样依赖了 dubbo-demo-interface 这个公共模块。
在 dubbo-consumer.xml 配置文件中,会指定注册中心地址(就是前面 ZooKeeper 的地址),这样 Dubbo 才能从 ZooKeeper 中拉取到 Provider 暴露的服务列表信息:
<!-- Zookeeper地址 -->

<dubbo:registry address="zookeeper://127.0.0.1:2181"/>
还会使用 dubbo:reference 引入 DemoService 服务,后面可以作为 Spring Bean 使用:
<!--引入DemoService服务,并配置成Spring Bean-->

<dubbo:reference id="demoService" check="false"

                 interface="org.apache.dubbo.demo.DemoService"/>
最后,在 Application 中写个 main() 方法,指定 Spring 配置文件并启动 ClassPathXmlApplicationContext 之后,就可以远程调用 Provider 端的 DemoService 的 sayHello() 方法了。
Demo 2:基于注解配置
dubbo-demo-annotation 模块是基于 Spring 注解配置的示例,无非就是将 XML 的那些配置信息转移到了注解上。
我们先来看 dubbo-demo-annotation-provider 这个示例模块:
public class Application {

    public static void main(String[] args) throws Exception {

	    // 使用AnnotationConfigApplicationContext初始化Spring容器,

        // 从ProviderConfiguration这个类的注解上拿相关配置信息

        AnnotationConfigApplicationContext context =

              new AnnotationConfigApplicationContext(

                  ProviderConfiguration.class);

        context.start();

        System.in.read();

    }

    @Configuration // 配置类

    // @EnableDubbo注解指定包下的Bean都会被扫描,并做Dubbo服务暴露出去

    @EnableDubbo(scanBasePackages = "org.apache.dubbo.demo.provider")

    // @PropertySource注解指定了其他配置信息

    @PropertySource("classpath:/spring/dubbo-provider.properties")

    static class ProviderConfiguration {

        @Bean

        public RegistryConfig registryConfig() {

            RegistryConfig registryConfig = new RegistryConfig();

            registryConfig.setAddress("zookeeper://127.0.0.1:2181");

            return registryConfig;

        }

    }

}
这里,同样会有一个 DemoServiceImpl 实现了 DemoService 接口,并且在 org.apache.dubbo.demo.provider 目录下,能被扫描到,暴露成 Dubbo 服务。
接着再来看 dubbo-demo-annotation-consumer 模块,其中 Application 中也是通过 AnnotationConfigApplicationContext 初始化 Spring 容器,也会扫描指定目录下的 Bean,会扫到 DemoServiceComponent 这个 Bean,其中就通过 @Reference 注解注入 Dubbo 服务相关的 Bean:
@Component("demoServiceComponent")

public class DemoServiceComponent implements DemoService {

    @Reference // 注入Dubbo服务

    private DemoService demoService;

    @Override

    public String sayHello(String name) {

        return demoService.sayHello(name);

    }

	  // 其他方法

}
Demo 3:基于 API 配置
在有的场景中,不能依赖于 Spring 框架,只能使用 API 来构建 Dubbo Provider 和 Consumer,比较典型的一种场景就是在写 SDK 的时候。
先来看 dubbo-demo-api-provider 模块,其中 Application.main() 方法是入口:
// 创建一个ServiceConfig的实例,泛型参数是业务接口实现类,

// 即DemoServiceImpl

ServiceConfig<DemoServiceImpl> service = new ServiceConfig<>();

// 指定业务接口

service.setInterface(DemoService.class);

// 指定业务接口的实现,由该对象来处理Consumer的请求

service.setRef(new DemoServiceImpl());

// 获取DubboBootstrap实例,这是个单例的对象

DubboBootstrap bootstrap = DubboBootstrap.getInstance();

//生成一个 ApplicationConfig 的实例、指定ZK地址以及ServiceConfig实例

bootstrap.application(new ApplicationConfig("dubbo-demo-api-provider"))

        .registry(new RegistryConfig("zookeeper://127.0.0.1:2181"))

        .service(service)

        .start()

        .await();
这里,同样会有一个 DemoServiceImpl 实现了 DemoService 接口,并且在 org.apache.dubbo.demo.provider 目录下,能被扫描到,暴露成 Dubbo 服务。
再来看 dubbo-demo-api-consumer 模块,其中 Application 中包含一个普通的 main() 方法入口:
 // 创建ReferenceConfig,其中指定了引用的接口DemoService

 ReferenceConfig<DemoService> reference = new ReferenceConfig<>();

 reference.setInterface(DemoService.class);

 reference.setGeneric("true");


 // 创建DubboBootstrap,指定ApplicationConfig以及RegistryConfig

 DubboBootstrap bootstrap = DubboBootstrap.getInstance();

 bootstrap.application(new ApplicationConfig("dubbo-demo-api-consumer"))

         .registry(new RegistryConfig("zookeeper://127.0.0.1:2181"))

         .reference(reference)

         .start();

 // 获取DemoService实例并调用其方法

 DemoService demoService = ReferenceConfigCache.getCache()

    .get(reference);

 String message = demoService.sayHello("dubbo");

 System.out.println(message);
总结
在本课时,我们首先介绍了 Dubbo 的核心架构以及各核心组件的功能,接下来又搭建了 Dubbo 源码环境,并详细介绍了 Dubbo 核心模块的功能,为后续分析 Dubbo 源码打下了基础。最后我们还深入分析了 Dubbo 源码中自带的三个 Demo 示例,现在你就可以以这三个 Demo 示例为入口 Debug Dubbo 源码了。
在后面的课时中,我们将解决几个问题:Dubbo 是如何与 ZooKeeper 等注册中心进行交互的?Provider 与 Consumer 之间是如何交互的?为什么我们在编写业务代码的时候,感受不到任何网络交互?Dubbo Provider 发布到注册中心的数据是什么?Consumer 为何能正确识别?两者的统一契约是什么?这个契约是如何做到可扩展的?这个契约还会用在 Dubbo 的哪些地方?这些问题你也可以提前思考一下,在后面的课程中我会一一为你解答。
